Completing Dialogue Outside the Dialogue Tile
Select the applicable tab to learn about completing Dialogue outside the Dialogue tile in your province.
For more information, select the dropdowns below.
 From Intake
The Dialogue option from Intake is only available for pharmacist users.
To complete dialogue from Intake:
-
Do one of the following to open the Intake window:
-
From the Workflow Workbench, select Intake.
-
From the Patient Profile, select Intake.
-
From the Fax tile, select a prescription fax and then Intake.
-
-
Search for and select a patient, if not already entered.
-
In the Data Entry or Clinical tab, search for and select a drug. If you are performing dialogue for multiple prescriptions, you can enter multiple drugs by separating them with a backslash (/). Each drug will be separated into its own shell in Intake with the patient copied over.
-
Select the Dialogue Required checkbox for the applicable prescriptions in Intake. The default setting of this checkbox is based on the E-Dialogue preference and the prescription type.
Dialogue Required Checkbox Defaults
E-Dialogue New Rx Refill Rx ReAuth Rx Editable* All ON ON ON YES New ON OFF OFF YES Manual OFF OFF OFF YES No OFF OFF OFF NO *In British Columbia and Manitoba, the Dialogue Required checkbox is always on and disabled due to comply with provincial requirements.
-
Select Rx > Dialogue.
-
If more than one prescription is loaded into Intake, a prompt appears. Choose which prescriptions to complete dialogue for by selecting one of the options.
-
Selected Prescription Only (default) - only the prescription in the current shell is loaded into the Dialogue window.
-
All prescriptions flagged as "Dialogue Required" - only prescriptions with a selected patient and drug, where dialogue is required but not yet completed, are loaded into the Dialogue window.
-
All Prescriptions - all prescriptions with a selected patient and drug are loaded into the Dialogue window, whether or not dialogue is required or already completed.
The Dialogue window opens.
-
-
In the Consultation section, select the applicable options for the following:
-
Consultation With
-
Consultation Place
-
Consultation Outcome
-
Checkboxes
-
-
In the Notes section, enter your notes for the consultation.
-
Select the Guidelines button for information on what must be discussed during counselling for new and refill prescriptions. This window can be kept open while you enter information in the Dialogue tab.
-
When entering information in the Notes field, select the expander icon
 to open the Pharmacist Comments window. Selecting one of these comments auto-inserts common information discussed during patient counseling.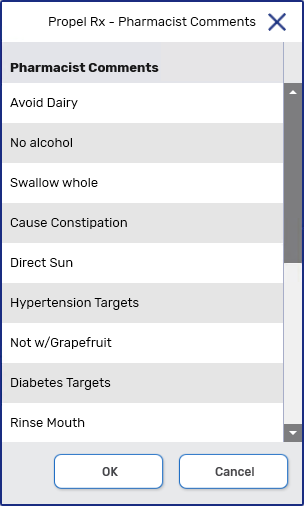
-
To view notes entered for previous prescriptions in the same chain, select the expander button
beside the previous notes.
-
-
Optional: Select the Carry Forward Notes checkbox if multiple dialogues are being completed and you want to copy the notes from the first dialogue to the subsequent dialogues loaded in the window.
-
Once this checkbox is selected, the Notes field becomes disabled for all dialogue records except the first.
-
Select Add Note
 beside previous notes if you want to add dialogue notes that are specific to one prescription.
-
-
Optional - In the Patient Follow-up section, enter a date and time for a follow-up with the patient. Information about the follow-up can be entered in the Comment field. When the dialogue is completed, a follow-up activity will be placed in the Activities tile.
-
If you have multiple dialogues to complete in Intake, select the navigation buttons at the bottom to move to the next one. Repeat steps 7 - 10.
-
Select Complete.
-
The Signature window opens. Sign the prescription using one of the following methods:
-
Credential entry - initials of the signing Pharmacist are used.
-
Biometric fingerprint scan - initials of the signing Pharmacist are used.
-
Manual signature using a signature pad or mouse - the initials of the logged in Pharmacist user are assumed. However, the signature of the signing pharmacist is captured and appears on all prescription documentation.
Not all signing methods are available
The methods available depend on the hardware installed at the workstation and whether an E-Signature has been set up for the pharmacist. See Signature Window for more information.
The following updates are made:
-
"Completed" displays in brackets beside the Dialogue Required checkbox.
-
The Dialogue row on the e-File copy and Workflow Details are updated.
-
The dialogue record is added to the patient's Clinical tab. Once the prescription has been filled or placed on Hold, details of the prescription (i.e., Rx #, drug, lot, expiry, SIG) will be saved in the dialogue record. For more information, see Clinical Tab Dialogue.
-
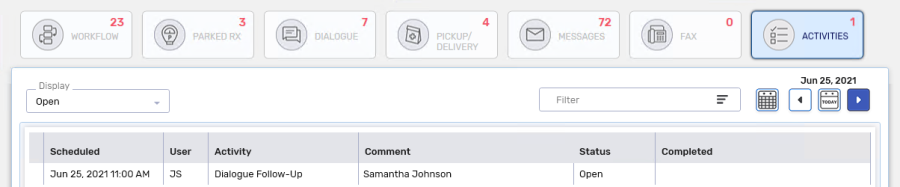
If a follow-up was scheduled, the follow-up is scheduled in the Activities tile for the day specified.
-
From the Workbench or Pick Up/Delivery Tile
To complete dialogue from the Workbench or Pick Up/Delivery tile:
-
Highlight the prescription from the Workbench or Pick Up/Delivery tile.
If the prescription is still in Data Entry, you can complete dialogue from Intake.
-
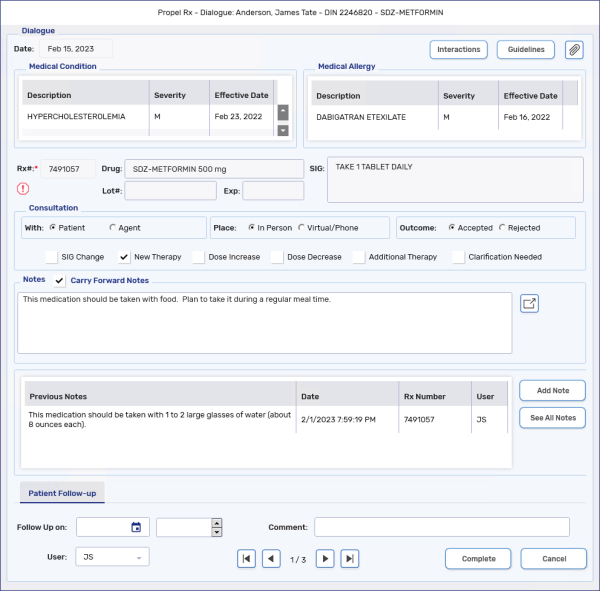
Select Rx > Dialogue. The Dialogue window opens.
For detailed information about the Dialogue window, see Dialogue Window Overview.
-
In the Consultation section, select the applicable options for the following:
-
Consultation With
-
Consultation Place
-
Consultation Outcome
-
Checkboxes
-
-
Optional: Select the Interactions button to review and/or print the interactions that appeared in Rx Detail when processing the prescription.
To quickly invoke the button, select Alt + I on your keyboard.
-
In the Notes section, enter your notes for the consultation.
-
Select the Guidelines button for information on what must be discussed during counselling for new and refill prescriptions. This window can be kept open while you enter information in the Dialogue window.
-
To view notes entered for previous prescriptions in the same chain, select the See All Notes button.
-
When entering information in the Notes field, select the expander icon
to open the Pharmacist Comments window. Selecting one of these comments auto-inserts common information discussed during patient counseling.
-
-
Optional: Select the Carry Forward Notes checkbox if multiple dialogues are being completed and you want to copy the notes from the first dialogue to the subsequent dialogues loaded in the window.
-
Once this checkbox is selected, the Notes field becomes disabled for all dialogue records except the first.
-
Select Add Note if you want to add dialogue notes that are specific to one prescription.
-
-
Optional - In the Patient Follow-up section, enter a date and time for a follow-up with the patient. Information about the follow-up can be entered in the Comment field. When the dialogue is completed, a follow-up activity will be placed in the Activities tile.
-
Select Complete. The Signature window opens upon selecting Complete. Sign the prescription using one of the following methods:
- Credential entry - initials of the signing Pharmacist are used.
-
Biometric fingerprint scan - initials of the signing Pharmacist are used.
-
Manual signature using a signature pad or mouse - the initials of the logged in Pharmacist user are assumed. However, the signature of the signing pharmacist is captured and appears on all prescription documentation.
Not all signing methods are available
The methods available depend on the hardware installed at the workstation and whether an E-Signature has been set up for the pharmacist. See Signature Window for more information.
-
The Dialogue window closes and the prescription is removed from the Dialogue tile. The following updates are made:
-
The Dialogue row on the e-File copy and Workflow Details are updated.
-
The dialogue record is added to the patient's Clinical tab. For more information, see Clinical Tab Dialogue.
-
If a follow-up was scheduled, the follow-up is scheduled in the Activities tile for the day specified.
-
From the Patient Profile
To complete dialogue from the Patient Profile:
-
Open the Patient Folder.
-
Select the Profile tab.
-
Select the prescription that you want to complete dialogue for.
-
Select Rx > Dialogue. The Dialogue window opens.
For detailed information about the Dialogue window, see Dialogue Window Overview.
-
In the Consultation section, select the applicable options for the following:
-
Consultation With
-
Consultation Place
-
Consultation Outcome
-
Checkboxes
-
-
Optional: Select the Interactions button to review and/or print the interactions that appeared in Rx Detail when processing the prescription.
To quickly invoke the button, select Alt + I on your keyboard.
-
In the Notes section, enter your notes for the consultation.
-
Select the Guidelines button for information on what must be discussed during counselling for new and refill prescriptions. This window can be kept open while you enter information in the Dialogue window.
-
To view notes entered for previous prescriptions in the same chain, select the See All Notes button.
-
When entering information in the Notes field, select the expander icon
to open the Pharmacist Comments window. Selecting one of these comments auto-inserts common information discussed during patient counseling.
-
-
Optional: Select the Carry Forward Notes checkbox if multiple dialogues are being completed and you want to copy the notes from the first dialogue to the subsequent dialogues loaded in the window.
-
Once this checkbox is selected, the Notes field becomes disabled for all dialogue records except the first.
-
Select Add Note if you want to add dialogue notes that are specific to one prescription.
-
-
Optional - In the Patient Follow-up section, enter a date and time for a follow-up with the patient. Information about the follow-up can be entered in the Comment field. When the dialogue is completed, a follow-up activity will be placed in the Activities tile.
-
Select Complete. The Signature window opens upon selecting Complete. Sign the prescription using one of the following methods:
- Credential entry - initials of the signing Pharmacist are used.
-
Biometric fingerprint scan - initials of the signing Pharmacist are used.
-
Manual signature using a signature pad or mouse - the initials of the logged in Pharmacist user are assumed. However, the signature of the signing pharmacist is captured and appears on all prescription documentation.
Not all signing methods are available
The methods available depend on the hardware installed at the workstation and whether an E-Signature has been set up for the pharmacist. See Signature Window for more information.
-
The Dialogue window closes and the prescription is removed from the Dialogue tile. The following updates are made:
-
The Dialogue row on the e-File copy and Workflow Details are updated.
-
The dialogue record is added to the patient's Clinical tab. For more information, see Clinical Tab Dialogue.
-
If a follow-up was scheduled, the follow-up is scheduled in the Activities tile for the day specified.
-
From the Patient Clinical History
To complete dialogue from the Patient Clinical History:
-
Open the Patient Folder.
-
Select the Clinical tab.
-
Select Dialogue. The Dialogue window opens.
For detailed information about the Dialogue window, see Dialogue Window Overview.
-
In the Rx # field, enter the prescription number that you want to complete dialogue for. Once done, press TAB on the keyboard and the prescription information auto-populates in the window.
-
In the Consultation section, select the applicable options for the following:
-
Consultation With
-
Consultation Place
-
Consultation Outcome
-
Checkboxes
-
-
Optional: Select the Interactions button to review and/or print the interactions that appeared in Rx Detail when processing the prescription.
To quickly invoke the button, select Alt + I on your keyboard.
-
In the Notes section, enter your notes for the consultation.
-
Select the Guidelines button for information on what must be discussed during counselling for new and refill prescriptions. This window can be kept open while you enter information in the Dialogue window.
-
To view notes entered for previous prescriptions in the same chain, select the See All Notes button.
-
When entering information in the Notes field, select the expander icon
to open the Pharmacist Comments window. Selecting one of these comments auto-inserts common information discussed during patient counseling.
-
-
Optional: Select the Carry Forward Notes checkbox if multiple dialogues are being completed and you want to copy the notes from the first dialogue to the subsequent dialogues loaded in the window.
-
Once this checkbox is selected, the Notes field becomes disabled for all dialogue records except the first.
-
Select Add Note if you want to add dialogue notes that are specific to one prescription.
-
-
Optional - In the Patient Follow-up section, enter a date and time for a follow-up with the patient. Information about the follow-up can be entered in the Comment field. When the dialogue is completed, a follow-up activity will be placed in the Activities tile.
-
Select Complete. The Signature window opens upon selecting Complete. Sign the prescription using one of the following methods:
- Credential entry - initials of the signing Pharmacist are used.
-
Biometric fingerprint scan - initials of the signing Pharmacist are used.
-
Manual signature using a signature pad or mouse - the initials of the logged in Pharmacist user are assumed. However, the signature of the signing pharmacist is captured and appears on all prescription documentation.
Not all signing methods are available
The methods available depend on the hardware installed at the workstation and whether an E-Signature has been set up for the pharmacist. See Signature Window for more information.
-
The Dialogue window closes and the prescription is removed from the Dialogue tile. The following updates are made:
-
The Dialogue row on the e-File copy and Workflow Details are updated.
-
The dialogue record is added to the patient's Clinical tab. For more information, see Clinical Tab Dialogue.
-
If a follow-up was scheduled, the follow-up is scheduled in the Activities tile for the day specified.
-
From Workflow
To complete dialogue during Workflow:
-
Process the prescription from the Workbench or Patient Profile. The prescription opens in one of the following windows:
-
Packaging
-
Technical Validation
-
Clinical Review
If the prescription is still in Data Entry, you can complete dialogue from Intake.
-
-
Select Rx > Dialogue. The Dialogue window opens.
For detailed information about the Dialogue window, see Dialogue Window Overview.
-
In the Consultation section, select the applicable options for the following:
-
Consultation With
-
Consultation Place
-
Consultation Outcome
-
Checkboxes
-
-
Optional: Select the Interactions button to review and/or print the interactions that appeared in Rx Detail when processing the prescription.
To quickly invoke the button, select Alt + I on your keyboard.
-
In the Notes section, enter your notes for the consultation.
-
Select the Guidelines button for information on what must be discussed during counselling for new and refill prescriptions. This window can be kept open while you enter information in the Dialogue window.
-
To view notes entered for previous prescriptions in the same chain, select the See All Notes button.
-
When entering information in the Notes field, select the expander icon
to open the Pharmacist Comments window. Selecting one of these comments auto-inserts common information discussed during patient counseling.
-
-
Optional: Select the Carry Forward Notes checkbox if multiple dialogues are being completed and you want to copy the notes from the first dialogue to the subsequent dialogues loaded in the window.
-
Once this checkbox is selected, the Notes field becomes disabled for all dialogue records except the first.
-
Select Add Note if you want to add dialogue notes that are specific to one prescription.
-
-
Optional - In the Patient Follow-up section, enter a date and time for a follow-up with the patient. Information about the follow-up can be entered in the Comment field. When the dialogue is completed, a follow-up activity will be placed in the Activities tile.
-
Select Complete. The Signature window opens upon selecting Complete. Sign the prescription using one of the following methods:
- Credential entry - initials of the signing Pharmacist are used.
-
Biometric fingerprint scan - initials of the signing Pharmacist are used.
-
Manual signature using a signature pad or mouse - the initials of the logged in Pharmacist user are assumed. However, the signature of the signing pharmacist is captured and appears on all prescription documentation.
Not all signing methods are available
The methods available depend on the hardware installed at the workstation and whether an E-Signature has been set up for the pharmacist. See Signature Window for more information.
-
The Dialogue window closes and the prescription is removed from the Dialogue tile. The following updates are made:
-
The Dialogue row on the e-File copy and Workflow Details are updated.
-
The dialogue record is added to the patient's Clinical tab. For more information, see Clinical Tab Dialogue.
-
If a follow-up was scheduled, the follow-up is scheduled in the Activities tile for the day specified.
-
For more information, use the dropdowns below.
From Intake
The Dialogue option from Intake is only available for pharmacist users.
To complete dialogue from Intake:
-
Do one of the following to open the Intake window:
-
From the Workflow Workbench, select Intake.
-
From the Patient Profile, select Intake.
-
From the Fax tile, select a prescription fax and then Intake.
-
-
Search for and select a patient, if not already entered.
-
If a drug was not entered in the Data Entry tab, in the Drug Name field, search for and select a drug. The drug selection will write back to the Data Entry tab.
If you are performing dialogue for multiple prescriptions, you can enter multiple drugs by separating them with a backslash (/). Each drug will be separated into its own shell in Intake with the patient copied over.
-
Select the Dialogue Required checkbox for the applicable prescriptions in Intake. The default setting of this checkbox is based on the E-Dialogue preference and the prescription type.
Dialogue Required Checkbox Defaults
E-Dialogue New Rx Refill Rx ReAuth Rx Editable* All ON ON ON YES New ON OFF OFF YES Manual OFF OFF OFF YES No OFF OFF OFF NO *In British Columbia and Manitoba, the Dialogue Required checkbox is always on and disabled due to comply with provincial requirements.
-
Select Rx > Dialogue.
-
If more than one prescription is loaded into Intake, a prompt appears. Choose which prescriptions to complete dialogue for by selecting one of the options.
-
Selected Prescription Only (default) - only the prescription in the current shell is loaded into the Dialogue window.
-
All prescriptions flagged as "Dialogue Required" - only prescriptions with a selected patient and drug, where dialogue is required but not yet completed, are loaded into the Dialogue window.
-
All Prescriptions - all prescriptions with a selected patient and drug are loaded into the Dialogue window, whether or not dialogue is required or already completed.
The Dialogue window opens.
-
-
In the Consultation section, select the applicable options for the following:
-
Consultation With
-
Consultation Place
-
Consultation Outcome
-
Checkboxes
-
-
In the Notes section, enter your notes for the consultation.
-
When entering information in the Notes field, select the expander icon
to open the Pharmacist Comments window. Selecting one of these comments auto-inserts common information discussed during patient counseling.
-
To view notes entered for previous prescriptions in the same chain, select the expander button
beside the previous notes.
-
-
Optional: Select the Carry Forward Notes checkbox if multiple dialogues are being completed and you want to copy the notes from the first dialogue to the subsequent dialogues loaded in the window.
-
Once this checkbox is selected, the Notes field becomes disabled for all dialogue records except the first.
-
Select Add Note
beside previous notes if you want to add dialogue notes that are specific to one prescription.
-
-
Optional - In the Patient Follow-up section, enter a date and time for a follow-up with the patient. Information about the follow-up can be entered in the Comment field. When the dialogue is completed, a Follow-Up Activity will be placed in the Activities tile.
-
If you have multiple dialogues to complete in Intake, select the navigation buttons at the bottom to move to the next one. Repeat steps 7 - 10.
-
Select Complete.
The following updates are made:
-
"Completed" displays in brackets beside the Dialogue Required checkbox.
-
The Dialogue row on the e-File copy and Workflow Details are updated.
-
The dialogue record is added to the patient's Clinical tab. Once the prescription has been filled or placed on Hold, details of the prescription (i.e., Rx #, drug, lot, expiry, SIG) will be saved in the dialogue record. For more information, see Clinical Tab Dialogue.
-
If a follow-up was scheduled, the follow-up is scheduled in the Activities tile for the day specified.
-
From the Workbench or Pick Up/Delivery Tile
To complete dialogue from the Workbench or Pick Up/Delivery tile:
-
Highlight the prescription from the Workbench or Pick Up/Delivery tile.
If the prescription is still in Data Entry, you can complete dialogue from Intake. .
-
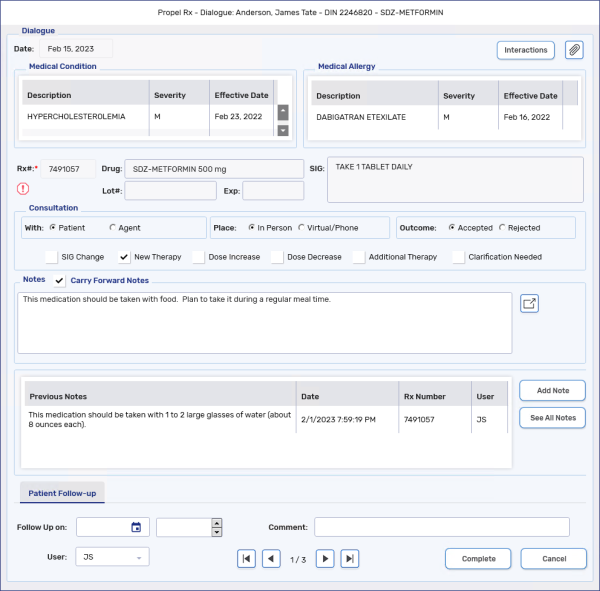
Select Rx > Dialogue. The Dialogue window opens.
For detailed information about the Dialogue window, see Dialogue Window Overview.
-
In the Consultation section, select the applicable options for the following:
-
Consultation With
-
Consultation Place
-
Consultation Outcome
-
Checkboxes
-
-
Optional: Select the Interactions button to review and/or print the interactions that appeared in Rx Detail when processing the prescription.
To quickly invoke the button, select Alt + I on your keyboard.
-
In the Notes section, enter your notes for the consultation.
-
To view notes entered for previous prescriptions in the same chain, select the See All Notes button.
-
When entering information in the Notes field, select the expander icon
to open the Pharmacist Comments window. Selecting one of these comments auto-inserts common information discussed during patient counseling.
-
-
Optional: Select the Carry Forward Notes checkbox if multiple dialogues are being completed and you want to copy the notes from the first dialogue to the subsequent dialogues loaded in the window.
-
Once this checkbox is selected, the Notes field becomes disabled for all dialogue records except the first.
-
Select Add Note if you want to add dialogue notes that are specific to one prescription.
-
-
Optional - In the Patient Follow-up section, enter a date and time for a follow-up with the patient. Information about the follow-up can be entered in the Comment field. When the dialogue is completed, a follow-up activity will be placed in the Activities tile.
-
Select Complete.
-
The Dialogue window closes and the prescription is removed from the Dialogue tile. The following updates are made:
-
The Dialogue row on the e-File copy and Workflow Details are updated.
-
The dialogue record is added to the patient's Clinical tab. For more information, see Clinical Tab Dialogue.
-
If a follow-up was scheduled, the follow-up is scheduled in the Activities tile for the day specified.
-
From the Patient Profile
Watch an overview of how to document dialogue from the Patient Profile below:
To complete dialogue from the Patient Profile:
-
Open the Patient Folder.
-
Select the Profile tab.
-
Select the prescription that you want to complete dialogue for.
-
Select Rx > Dialogue. The Dialogue window opens.
For detailed information about the Dialogue window, see Dialogue Window Overview.
-
In the Consultation section, select the applicable options for the following:
-
Consultation With
-
Consultation Place
-
Consultation Outcome
-
Checkboxes
-
-
Optional: Select the Interactions button to review and/or print the interactions that appeared in Rx Detail when processing the prescription.
To quickly invoke the button, select Alt + I on your keyboard.
-
In the Notes section, enter your notes for the consultation.
-
To view notes entered for previous prescriptions in the same chain, select the See All Notes button.
-
When entering information in the Notes field, select the expander icon
to open the Pharmacist Comments window. Selecting one of these comments auto-inserts common information discussed during patient counseling.
-
-
Optional: Select the Carry Forward Notes checkbox if multiple dialogues are being completed and you want to copy the notes from the first dialogue to the subsequent dialogues loaded in the window.
-
Once this checkbox is selected, the Notes field becomes disabled for all dialogue records except the first.
-
Select Add Note if you want to add dialogue notes that are specific to one prescription.
-
-
Optional - In the Patient Follow-up section, enter a date and time for a follow-up with the patient. Information about the follow-up can be entered in the Comment field. When the dialogue is completed, a follow-up activity will be placed in the Activities tile.
-
Select Complete.
-
The Dialogue window closes and the prescription is removed from the Dialogue tile. The following updates are made:
-
The Dialogue row on the e-File copy and Workflow Details are updated.
-
The dialogue record is added to the patient's Clinical tab. For more information, see Clinical Tab Dialogue.
-
If a follow-up was scheduled, the follow-up is scheduled in the Activities tile for the day specified.
-
From the Patient Clinical History
To complete dialogue from the Patient Clinical History:
-
Open the Patient Folder.
-
Select the Clinical tab.
-
Select Dialogue. The Dialogue window opens.
For detailed information about the Dialogue window, see Dialogue Window Overview.
-
In the Rx # field, enter the prescription number that you want to complete dialogue for. Once done, press TAB on the keyboard and the prescription information auto-populates in the window.
-
In the Consultation section, select the applicable options for the following:
-
Consultation With
-
Consultation Place
-
Consultation Outcome
-
Checkboxes
-
-
Optional: Select the Interactions button to review and/or print the interactions that appeared in Rx Detail when processing the prescription.
To quickly invoke the button, select Alt + I on your keyboard.
-
In the Notes section, enter your notes for the consultation.
-
To view notes entered for previous prescriptions in the same chain, select the See All Notes button.
-
When entering information in the Notes field, select the expander icon
to open the Pharmacist Comments window. Selecting one of these comments auto-inserts common information discussed during patient counseling.
-
-
Optional: Select the Carry Forward Notes checkbox if multiple dialogues are being completed and you want to copy the notes from the first dialogue to the subsequent dialogues loaded in the window.
-
Once this checkbox is selected, the Notes field becomes disabled for all dialogue records except the first.
-
Select Add Note if you want to add dialogue notes that are specific to one prescription.
-
-
Optional - In the Patient Follow-up section, enter a date and time for a follow-up with the patient. Information about the follow-up can be entered in the Comment field. When the dialogue is completed, a follow-up activity will be placed in the Activities tile.
-
Select Complete.
-
The Dialogue window closes and the prescription is removed from the Dialogue tile. The following updates are made:
-
The Dialogue row on the e-File copy and Workflow Details are updated.
-
The dialogue record is added to the patient's Clinical tab. For more information, see Clinical Tab Dialogue.
-
If a follow-up was scheduled, the follow-up is scheduled in the Activities tile for the day specified.
-
From Workflow
To complete during Workflow:
-
Process the prescription from the Workbench or Patient Profile. The prescription opens in one of the following windows:
-
Packaging
-
Technical Validation
-
Clinical Review
Dialogue cannot be completed if the prescription is still in Data Entry.
-
-
Select Rx > Dialogue. The Dialogue window opens.
For detailed information about the Dialogue window, see Dialogue Window Overview.
-
In the Consultation section, select the applicable options for the following:
-
Consultation With
-
Consultation Place
-
Consultation Outcome
-
Checkboxes
-
-
Optional: Select the Interactions button to review and/or print the interactions that appeared in Rx Detail when processing the prescription.
To quickly invoke the button, select Alt + I on your keyboard.
-
In the Notes section, enter your notes for the consultation.
-
To view notes entered for previous prescriptions in the same chain, select the See All Notes button.
-
When entering information in the Notes field, select the expander icon
to open the Pharmacist Comments window. Selecting one of these comments auto-inserts common information discussed during patient counseling.
-
-
Optional: Select the Carry Forward Notes checkbox if multiple dialogues are being completed and you want to copy the notes from the first dialogue to the subsequent dialogues loaded in the window.
-
Once this checkbox is selected, the Notes field becomes disabled for all dialogue records except the first.
-
Select Add Note if you want to add dialogue notes that are specific to one prescription.
-
-
Optional - In the Patient Follow-up section, enter a date and time for a follow-up with the patient. Information about the follow-up can be entered in the Comment field. When the dialogue is completed, a follow-up activity will be placed in the Activities tile.
-
Select Complete.
-
The Dialogue window closes and the prescription is removed from the Dialogue tile. The following updates are made:
-
"Completed" displays in brackets beside the Dialogue Required checkbox.
-
The Dialogue row on the e-File copy and Workflow Details are updated.
-
The dialogue record is added to the patient's Clinical tab. For more information, see Clinical Tab Dialogue.
-
If a follow-up was scheduled, the follow-up is scheduled in the Activities tile for the day specified.
-